Softmatic BarcodeFactory
Softmatic® BarcodeFactory™ is the perfect tool for batch creation of barcodes on your Mac or PC. Generate serial, consecutive barcodes with counters with ease.
Importing data from CSV or TXT files to batch create barcodes is also supported. Make multiple barcodes
with only a few button clicks.
This app is fairly straight forward to use and will prevent you from creating invalid codes. Nevertheless, we
recommended that you invest a few minutes to make yourself familiar with the software.
Should you encounter problems or have further questions regarding the creation and use
of bar codes, please contact us.
All screenshots below show the Mac version of the software. The Windows version looks identical and has the same
set of features.
Current version:
Windows: V4.9.x
Mac: V4.8.x
System requirements:
macOS 10.7 or higher
Windows 10 or higher
Supported barcode symbologies:
Retail barcodes: EAN 8, EAN 13, ISBN 10 / 13, UPC-A, UPC-E, Code 128 GS1
Pharmaceutical codes: PZN 7 / PZN 8, Laetus
Warehousing: Code 39, Code 128, Code 2/5 Industrial, Code 2/5 Interleaved, Codabar, ITF-14
2D area matrix codes: Datamatrix, Aztec, QR, PDF417
Databar GS1: Expanded, Expanded Stacked, Omnidirectional, Omnidirectional Stacked, Stacked, Truncated, Limited
Note: EAN 13 is referred to by many other names, e.g. JAN, EAN 99, EAN Velocity, etc..
All those codes are ordinary EAN 13.
Installation on a Windows PC
 Run setup.exe and follow the instructions on the screen. After the installer has finished,
launch the app by double-clicking the icon (pictured left).
Run setup.exe and follow the instructions on the screen. After the installer has finished,
launch the app by double-clicking the icon (pictured left).
Right after installation the software
runs in trial mode, limiting exports to low-resolution images. After entering your license key the app will be fully functional. Make sure to actually
type the key in, don't paste it. After entering the last sequence the key will be verified online. Please make
sure that the PC is connected to the Internet.
Installation on a Mac
If you purchased through our website:
Unzip the archive you downloaded and double-click the DMG file within. When the DMG is mounted, drag the icon to your applications folder.
The software starts in trial mode. After entering your license key the app will be fully functional. Make sure to actually
type the key in, don't paste it. After entering the last sequence the key will be verified online. Please make
sure that the Mac is connected to the Internet.
If you purchased through the App Store:
A dedicated installation or unlocking of the software is not required.
After downloading the app from the App Store, simply launch it by clicking the icon (pictured left).
Default settings
With the first launch of the software, the following settings are used:
Code type: Code 128
Data to encode: List of 10 numbers (100000, 100001s etc.)
Export format: EPS (PNG with the trial version)
Bounding box: No
Bar width reduction: 0
Module width: 0.5mm
Module height: 15mm
Margin: 8mm
The program window at the first launch (without data contents):
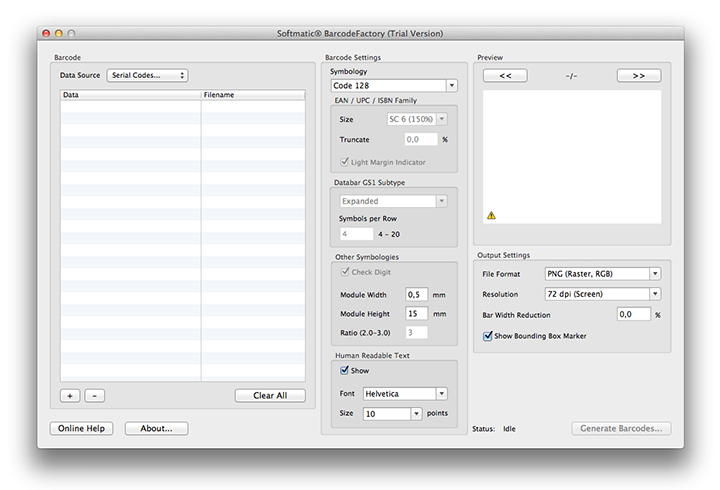
With the exception of the encoded data, all settings you make in the software are maintained between sessions.
Each time you launch the app it will start exactly where you left it the last time.
Please note that not all settings are available for all codes. For example, a UPC code is always used
with a check digit. Hence, the check digit control is disabled for this barcode symbology.
Usage Guidelines
Creating barcodes typically works in four steps:
1. Prepare data, either by generating numbers, by importing from various sources or by simply entering it manually
2. Choose barcode type and set barcode options
3. Choose export format and options
4. Generate barcodes
Prepare Data
BarcodeFactory supports the following data sources:
- Serial numbers from the built-in number generator
Select Serial... from the Data Source pop-up menu. The Serial Number panel opens:

Specify starting value, step (i.e. the steps between individual numbers), and the desired number of codes (max. 65536). If so desired
the generator can left-pad the number with zeroes. You can also specify static text that is prepended and appended
to the generated number.
With the settings above, the following sequence would be generated:
A000001B
A000002B
...seven more omitted...
A000010B
The generated numbers will also be used for the filename of the generated codes, truncated to 80 characters. By double-clicking
a filename you can simply edit and change the names to your liking. Same goes for the generated data.
Note: The sequence generator can generate numbers with a length of up to 18 digits.
For larger numbers or mixed alphanumeric sequences, consider generating the sequences outside the app,
e.g. with auto fill in Excel and then importing
or pasting the generated sequences as a text file.
- Random numbers from the built-in random number generator
Select Random... from the Data Source pop-up menu. The Random Number panel opens:

Specify the type of value, GUID or numeric with user-defined length (max. 256), and the desired number of codes (max. 65536).
A GUID is a 59-character long alpha-numeric string that is guaranteed to be unique
Example GUID: A7F438EE-21B4-465B-95F4-A09037D2BB6A-62572-000B167B69BF4389
The generated numbers will also be used for the filename of the generated codes, truncated to 80 characters. By double-clicking
a filename you can simply edit and change the names to your liking. Same goes for the generated data.
- Tabular data imported from a text file (TXT or CSV extensions)
Select Import... from the Data Source pop-up menu. A standard file dialog opens where you can pick
a file.
The software expects the data to be in the file row by row, e.g.:
100000
200000
300000
With just one column in the file as above, the filenames of the generated codes will be taken from the encoded data, truncated to
80 characters.
In addition to the encoded data you may also specity the output filename and supplementary data that is placed
above and below the generated code. The imported data is field-separated by a character that can be specified in
in Menu BarcodeFactory > Preferences... (Mac) and right-click in the application window for context menu >
Preferences... (Windows). Default field separator is the comma (,).
Up to four fields can be specified. Fields can be empty except for the first one. When two or more fields are present the
last one will be treated as filename. When three fields are imported the second field will be placed over the code.
When four fields are imported the second field will be placed over the code, the third below the code. If the last field
is empty or only one field (the actual data content) is present, the filename will be generated from the data content.
Examples:
-
Row: data,over,under,filename
Yields: Barcode with content "data", Text "over" over the barcode, "under" below the barcode,
written to file "filename":

-
Row: data,,under,filename
Yields: Barcode with content "data", no text over the barcode, "under" below the barcode,
written to file "filename".
-
Row: data,,under,
Yields: Barcode with content "data", no text over the barcode, "under" below the barcode,
written to file "data".
-
Row: data,over,under,
Yields: Barcode with content "data", Text "over" over the barcode, "under" below the barcode,
written to file "data".
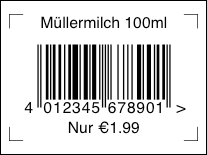
The added text may include all characters from the ISOLatin1 character set including the EUR symbol.
This covers all western languages. Sample shows an EAN13 with german umlauts and EUR symbol:
Any filenames must be specified without an extension.
- Tabular data pasted from the clipboard
Select Paste from the Data Source pop-up menu. Data is pasted directly into the table.
The software expects the data on the clipboard to be line by line, e.g.:
100000
200000
300000
With just one column as above, the filenames of the generated codes will be taken from the encoded data, truncated to
80 characters.
Additional data to put over and below the code as well as a filename can be specified in the previous section.
Tip: When copying / pasting from spreadsheets (Excel, Numbers) set the TAB as field separator in Barcode Factory >
Preferences... (Mac) or right-click > Preferences... (Windows).
- Manual entry of data
Select Manual... from the Data Source pop-up menu. A single data item is added to the table which you can edit
to your liking.
Use the "+" and "-" buttons at the bottom of the table to add and remove items.
Tip: The "+" and "-" buttons also work if the data in the table has been imported or generated by the software.
Specifying data for add-on codes
Codes EAN13 and ISBN 10/13 can carry a so called satellite or add-on barcode, encoding two or five digits.
This add-on data has to be entered together with the data of the main code, separated by a semi colon.
Examples:
Data entry for EAN 13 without add-on: 4012345678901
Data entry for EAN 13 with add-on: 4012345678901;90000
Data entry for ISBN-13 with add-on: 978-1-123-12345-6;90000
Import of ISBN-13 with add-on and file name: 978-1-123-12345-6;90000,filename
Choose barcode type
Choose the desired barcode type from the list of available codes:
Code EAN 8
Code EAN 13
Code ISBN 10
Code ISBN 13
Code UPC-A
Code UPC-E
Code 128
Code 128 GS1 / EAN / UCC
Code 2/5 Interleaved
Code 2/5 Industrial
Code ITF-14
Code 39 / 39 Extended
PZN 7/8 (Pharma code)
Laetus (Pharma code)
Codabar
Datamatrix (2D)
PDF417 (2D)
QR Code (2D)
Aztec Code (2D)
Databar GS1
Selecting Databar will also enable selection of a Databar sub type.
If you choose a code type that is incompatible with the given data, an little warning icon is displayed in the preview window.
Set barcode options
After choosing the barcode type, make the appropriate settings (the table also lists the kind of data the app expects for the respective code type):
| Symbology | Data | Settings | Remarks |
|---|
| EAN 8 | 7 or 8 digits | EAN size, truncation | |
| EAN 13 | 12 or 13 digits | EAN size, truncation, sentinel | |
| ISBN 10 | ISBN 10 Nr., e.g. 1-123-12345-X | EAN size, truncation, sentinel | |
| ISBN 13 | ISBN 13 Nr., e.g. 978-1-123-12345-6 | EAN size, truncation, sentinel | |
| UPC-A | 11 or 12 digits | EAN size, truncation | |
| UPC-E | 7 or 8 digits | EAN size, truncation | First digit must be a "0" or "1" |
| Code 128 | Digits, letters, special chars (max. 40 chars) | Module width, -height | Automatic selection of Code 128 sub types A, B, C |
| Code 128 GS1/EAN/UCC | Digits, letters, parenthesized application identifier (max. 40 chars) | Module width, -height | Automatic selection of Code 128 sub types A, B, C
Enter your data including application identifiers, e.g. (01)1234567890. The software will
automatically insert all required FNC1 symbols. |
| Code 2/5 Interleaved | Digits 0-9 (max. 40 digits) | Module width, -height, ratio, check digit | |
| Code 2/5 Industrial | Digits 0-9 (max. 40 digits) | Module width, -height, ratio, check digit | |
| Code ITF-14 | Digits 0-9 (exactly 14 digits) | Module width, -height, ratio | Software adds "bearer bar" |
| Code 39 / 39 Extended | Digits, letters (max. 40 chars) | Module width, -height, ratio, check digit | Automatic selection of Code 39 / Code 39 Extended |
| PZN 7/8 | 7 or 8 Digits | Module width, -height, ratio | Software will assemble PZN |
| Laetus | Digits 0-9, max. value 131070 | Module width, -height | |
| Codabar | Digits 0-9 (max. 40 chars) | Module width, -height | |
| Datamatrix | Up to 2000 chars ** | Module width | Square modules, width = height |
| PDF 417 | Up to 2000 chars ** | Module width | Module ratio height : width = 3 : 1 |
| QR | Up to 2000 chars ** | Module width | Square modules, width = height |
| Aztec | Up to 2000 chars ** | Module width | Square modules, width = height |
| Databar | Depends on sub type | | |
| Omnidir. | 13- or 14-digit GTIN | Module width and -height | |
| Omnidir. Stacked | 13- or 14-digit GTIN | Module width and -height | |
| Expanded | Up to 41 letters or 74 digits | Module width and -height | |
| Expanded Stacked | Up to 41 letters or 74 digits | Module width and -height, symbols per row | |
| Truncated | 13- or 14-digit GTIN | Module width and -height | |
| Stacked | 13- or 14-digit GTIN | Module width and -height | |
| Limited | 13- or 14-digit GTIN | Module width and -height | |
EAN/UPC height is determined by the value for "Truncation". This value is percentage based, i.e. if you enter "50" here
the code will have half the standard height. Remember to hit return after entering a value to update the preview.
** To encode non-printable characters, use the tilde, followed by the three digit ASCII code
of the character. E.g., to encode a TAB, use ~009. Special characters like german
umlauts or accented characters can be encoded directly into the available 2D symbologies.
Make sure that your barcode scanner has been set up correctly to transmit that kind of data.
Note:
To prevent typing errors, the software will always recalculate the respective check digit for the
selected code. For example, when using EAN 13, it doesn't matter if you enter 12 or 13 digits.
If it's 12, the software will append the check digit, if it's 13 the software will
overwrite the last digit with the check digit.
Notes regarding barcode settings
| Setting | Value range | Remarks |
|---|
| EAN Size | SC0 - SC9 | All retail barcodes, SC2 is the standard size |
| EAN Truncation | 0 - 80% | Min. height for EAN family codes is 15mm (5/8") |
| Light Margin Indicator | Yes / No | Aka. sentinel, EAN 13 / ISBN only |
| Symbols per Row | 4 - 20 | Databar Expanded Stacked only |
| Check digit | Yes / No | Code 2/5 family and Code 39 only |
| Module width | 0.1 - 2mm | Width of the narrowest bar. Code 2/5, ITF-14, Code 39, Code 128, PZN, Codabar, Databar, Laetus, all 2D Codes only |
| Modul height | 5 - 100mm | Height of the code not counting the readable text. Code 2/5, ITF-14, Code 39, Code 128, PZN, Codabar, Databar, Laetus only |
| Ratio | 2.0 - 3.0 | Code 2/5, Code 39, PZN, Codabar only |
| Readable text | Yes / No | All codes, except Laetus, 2D Codes (always No) and PZN, retail codes (always Yes) * |
| Readable font | Drop down list | All codes, except Laetus, 2D codes and retail codes * |
| Readable font size | Drop down list | All codes, except Laetus, 2D codes and retail codes * |
| Width reduction | 0 - 50% | see below |
| Bounding Box Marker | Yes / No | see below |
* With EAN/UPC the size of the human readable text
is determined by the software to ensure that the text fits under the barcode. All retail codes are always created
with human readable text.
Choose export format
Choose the desired export format from the list of available formats:
- EPS (Vector)
- SVG (Vector)
- TIFF (Raster)
- PNG (Raster)
- JPEG (Raster)
Selecting a raster format will also allow you to specify an output resolution. With EAN family
codes the minimum recommended resolution is 300 dpi. In most cases 1,200 dpi will be more than
sufficient.
If at all possible, prefer vector over raster formats as EPS and SVG are resolution independent
and will always result in the best possible output quality. The files are also much smaller.
Note that EPS and SVG files do not include the
human readable text as outlines. Instead, they reference the selected font. Make sure you have the font
available on the computer where the barcode is used eventually.
If the target software doesn't support either format, use TIFF. TIFFs are created in the CMYK
color space which is preferred by most print shops. Use PNG for barcodes that are used online or on screen
like in a browser window. Use JPEG only as a last resort.
Export options
- Reduce Width: To compensate for dot gain during printing. Ask your print shop
for recommendations.
Reasonable values:
- Offset printing: 1-2%
- Laser printing: 1-2%
- Thermo-, thermotransfer printing: 0%
- Inkjet printing: Plain paper - 5%, Inkjet paper - 1-2%
- Pad printing: up to 10%
- Margin: Specify margin around the code. Default: 8mm. Accepted values 2-50mm.
- Bounding Box marker: Indicates an area around the code
that is off limits for other artwork. Recommended, if you send the exported
barcode to a third party (designer, print shop etc.).
- Write full paths to filenames.txt: Writes the full paths of the generated
barcodes to the text file filenames.txt. The file will be created in the same folder as the barcode images.
The first line of the file only contains the word Barcode, which by convention is used as the field name
when importing.
This file can be very useful if you plan to import the created codes via data merge, for example into Excel, Word or Indesign.
For instructions on how to import multiple barcodes into Indesign via a CSV file, please see this
tutorial.
Softmatic BarcodeFactory will only create black barcode on white background (with EPS / SVG: transparent background).
We generally advise against colored barcodes or black barcodes on a colored background.
Generate Barcodes
Click Generate Barcodes... to pick an output folder. The software will then generate the barcodes and write them to file.
The progress is indicated in the status message next to the button.
Preferences
Use the Preferences... dialog to set the field separator for imported and pasted data.
Mac: Open the dialog with menu Barcode Factory > Preferences...
Windows: Open the dialog by right-clicking in the application window and selecting Preferences... from the context menu.

The default is comma (,) which
is the default separator for CSV files exported from Excel and other spreadsheets.
Tip: For tabular data copied to the clipboard from Excel select the TAB character as separator.
Handling large amounts of data
BarcodeFactory will generate hundreds of thousands of codes in one go.
However, with some barcode symbologies (namely 2D types) the app (which
works multi-threaded, i.e. creates many codes in parallel) may simply run
out of memory. Also, while having hundreds of thousands of files in a single folder is
theoretically permitted, both Mac and Window definitely have issues with
folders that large. So we usually recommend to split that kind of data
into more manageable chunks (like batches of max. 50000 records or so).
Other points to note:
- Make sure there's enough disk space. Create 1000 or so codes with your
output settings, note the file size and extrapolate.
- On a Mac, disable Spotlight indexing for the output folder.
- Don't export into a Dropbox folder. The Dropbox Garcon (the part that's responsible for painting those green checkmarks to the file icons) crashes
when too many files are added simultaneously.
- Make sure that the data is valid for the given code. If the app repeatedly halts
at some point, it's likely that there's invalid or perhaps
corrupted data. Can be something as simple as an extraneous TAB, comma, or
so. Same goes for the output filename if it comes from the imported data.
The app tries to sanitize the filename before writing the file but there
still might be invalid chars left, like a "/" or "\".
- The export folder should be on a local drive, not on the network.
Reset to Defaults
Should you get lost at some point it's easy to reset the app to the default settings as listed above.
Mac
Select menu Help > Reset Application.
Windows
Right-click anywhere in the application window and select Reset App to Defaults from the context menu.
|